Quick Answer: What Makes a Good GitHub Project README?
A strong GitHub project README lets a new reader understand the outcome, run the project, and decide what to do next. Open with a plain-language summary, then provide the quickest successful path: requirements, installation, a minimal command or example, and the expected result. After that, add deeper sections for configuration, project structure, contribution, license, and limitations.
The search intent behind how to write a good README for your GitHub project is different from a personal Profile README. A repository README documents software, data, a site, a package, or an experiment. A Profile README introduces a person. If you are writing the latter, use the Profile README template guide instead. This page stays focused on project onboarding and maintainability.
A README should reduce the number of questions a first-time user has to ask. Do not make readers infer the supported runtime, copy commands from an old issue, or guess where the demo starts. A concise README.md with accurate commands is better than a visually impressive page that cannot get someone from clone to first result.
Treat visuals and widgets as supporting evidence. A project screenshot, short GIF, architecture diagram, or test badge can help, but it should sit beside an explanation. For badge syntax and maintenance, see the README badges guide; for contribution visuals, use the GitHub contribution graph guide and explain what the visual actually measures.

Project README Sections That Earn Their Space
Use the table as a practical GitHub README template for a project. You do not need every section for every repository, but the first-time reader should be able to find the project purpose, the first successful run, and the next useful link without searching through prose.
Order sections by the reader's work. A public demo may deserve to appear near the top; a library may need installation and API examples first; an internal tool may need environment variables and access limits. Keep headings literal so they remain scannable in GitHub's outline.
| Section | Purpose | Keep | Avoid |
|---|---|---|---|
| Project summary | Tell readers what the repository does and who it is for. | One concrete outcome, scope, and status. | A slogan that never names the project or use case. |
| Features and demo | Show what a visitor can see or use. | A short feature list, live demo, output sample, or screenshot. | Claiming features that are not available in the current branch. |
| Requirements | Prevent setup surprises. | Runtime, operating system, dependencies, credentials, and supported versions. | Assuming every reader already knows the toolchain. |
| Installation | Move from clone to a working environment. | Commands in the correct order and a note about the working directory. | Commands copied from a stale issue or missing lockfile context. |
| Usage and configuration | Explain the main path and useful options. | A minimal example, inputs, outputs, environment variables, and expected result. | A reference dump before showing the first successful result. |
| Project structure | Help readers navigate the repository. | Only the folders and files a contributor needs to understand. | Listing every generated file or hiding important entry points. |
| Contributing | Set expectations for issues and pull requests. | Local checks, branch expectations, style rules, and a link to detailed docs. | Inviting contributions without explaining how to verify a change. |
| License and limitations | Make reuse and boundaries clear. | License, known limitations, data sources, and security or privacy notes. | Implying guarantees the project does not provide. |
A Five-Step Workflow for Writing the README
Write the README from the reader's first task, not from the order in which the code was built. The workflow below works for a new repository and for a README refresh after a release. Draft the words first; add screenshots and badges only after the core path is accurate.
A good README is also a maintenance surface. When a command, branch name, environment variable, screenshot, or demo URL changes, the README should be part of the same review.
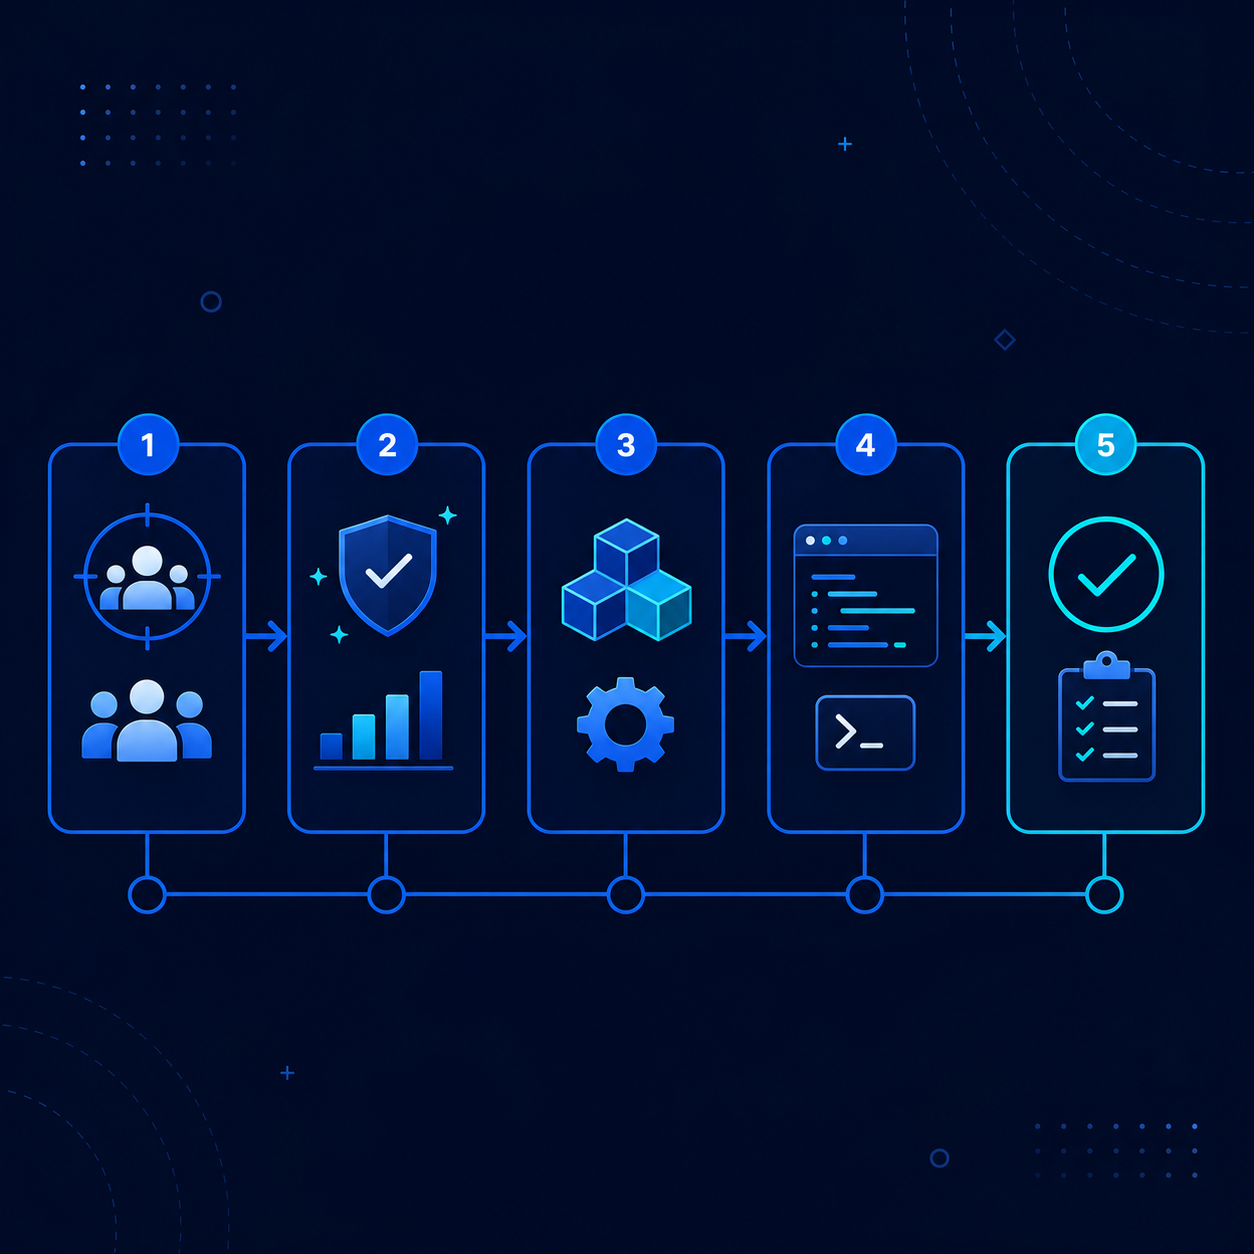
Define the reader and outcome
Decide whether the first reader is a user, contributor, reviewer, student, or evaluator. State what they should be able to accomplish after five minutes.
Outline the shortest successful path
Write the summary, requirements, install commands, minimal usage example, and expected output. If this path is unclear, do not add decoration yet.
Add project proof and context
Include features, a demo, screenshot, output sample, architecture note, or test signal that helps readers judge the repository without reading every file.
Document configuration and contribution
Explain environment variables, optional settings, project structure, local checks, issue expectations, license, and known limitations.
Run the README as a test
Clone the repository in a clean environment, follow the commands exactly, open every link, load every image, and review the rendered page on mobile before merging.
README Examples by Project Type
The best README file for a project showcase is not always the longest one. Match the evidence and setup instructions to what the repository actually delivers. A tiny CLI should feel quick; a web application needs a visible demo and environment notes; a library needs a copyable API example.
Use examples to show the difference between a useful section and a generic template. The same headings can be reused, but the proof, commands, and limitations must come from the real repository.
CLI or automation tool
Show the problem, installation command, one input/output example, supported flags, exit codes, and a safe way to test locally.
Web app or dashboard
Lead with a live demo or screenshot, list the required runtime and environment variables, explain the local start command, and say whether sample data is included.
Library or package
Put the install command and smallest import example near the top. Add supported runtimes, API links, version policy, and a short note about breaking changes.
Data or research project
Document the data source, preparation steps, expected outputs, reproducibility limits, license, and how a reader can inspect or cite the result.
Open-source community project
Make the contribution path visible: local setup, tests, formatting, issue labels, code of conduct, maintainers, and where larger design decisions are discussed.
How to Use Images, Badges and Demos
Images should answer a question that prose would answer slowly. Use a screenshot to show the finished interface, a diagram to explain architecture, an output sample to show a generated file, or a short animation when the interaction itself matters. Add descriptive alt text and keep the asset close to the section it explains.
Badges are optional metadata, not a substitute for documentation. A small row can show build status, package version, license, or coverage when the source is trustworthy. The GitHub README badges guide covers stable Markdown image-and-link patterns. Remove stale badges instead of allowing a red or broken image to become the first impression.
Activity visuals can add context to a project maintainer's profile, but they do not prove that a repository is useful. If you link a contribution chart, stats card, or 3D visual, explain what it measures and keep project behavior, tests, and examples as the primary evidence. The README Stats guide and GitHub City tool are optional supporting links, not replacements for a quick start.
Simple rule
If a visual does not help a reader understand, run, evaluate, or trust the project, move it lower or remove it. Keep the conclusion in HTML text, not inside an image.
Checks Before Publishing the README
Treat the README like a small release artifact. A clean browser or terminal test catches more problems than a final spelling pass alone.
| Problem | Likely cause | Fix |
|---|---|---|
| The first command fails | Missing runtime, wrong working directory, stale branch, or undocumented environment variable. | Run the quick start from a clean clone and update the requirements and command order. |
| The result is unclear | The README gives commands but no expected output or success signal. | Show a small output sample, screenshot, URL, test result, or file path. |
| A demo or image is broken | Renamed branch, private asset, relative-path error, expired host, or removed deployment. | Open every link and image from the rendered repository page; use stable paths and descriptive alt text. |
| Configuration is a mystery | Environment variables or optional services are only described in code. | List required values, safe placeholders, defaults, secrets handling, and a local example file. |
| Contributors cannot verify changes | No test, lint, format, or build command is documented. | Add the local checks that maintainers expect before opening a pull request. |
| README is hard to scan on mobile | Huge images, wide tables, long badge rows, or headings buried in paragraphs. | Compress media, keep tables narrow, use literal headings, and test the rendered page at a small viewport. |
| Claims are stronger than the project | Marketing language was copied from an old roadmap or template. | Tie each feature claim to a current demo, command, test, or known limitation. |
FAQ About GitHub Project READMEs
What should I put at the top of a project README?
Start with the project name, one-sentence outcome, current status, and the fastest link or command that lets a reader see it working. Put a longer background section below the quick start.
Does pushing a project to GitHub create a README automatically?
No. GitHub may offer to initialize a repository with a README when you create it, but pushing an existing local project does not write documentation for you. Add and commit README.md yourself.
Should I include the full folder structure?
Only show the folders and files that help a user or contributor navigate the project. A short annotated tree is more useful than a generated listing that changes on every build.
Can I use a README generator or prompt?
A generator or prompt can help create an outline, but verify every command, path, dependency, feature claim, screenshot, and license against the repository. Generated text is not project proof.
Where should badges go in a project README?
Place a small set near the title or project status when the badges are current and meaningful. Keep the install and usage path easy to find; a badge wall should not push the quick start below the fold.
How do I keep a README from becoming stale?
Review it with releases and pull requests, test the quick start periodically, remove obsolete screenshots and links, and treat environment variables, supported versions, and demo URLs as maintained data.